Archive

Archive for the ‘advice’ Category

>10 Ways to Improve Your Homebrew (Part 1 of 2)

> <!– /* Font Definitions */ @font-face {font-family:Cambria; panose-1:2 4 5 3 5 4 6 3 2 4; mso-font-charset:0; mso-generic-font-family:auto; mso-font-pitch:variable; mso-font-signature:3 0 0 0 1 0;} @font-face {font-family:"Trebuchet MS"; panose-1:2 11 6 3 2 2 2 2 2 4; mso-font-charset:0; mso-generic-font-family:auto; mso-font-pitch:variable; mso-font-signature:3 0 0 0 1 0;} @font-face {font-family:"Marker Felt"; panose-1:2 0 4 0 0 0 0 0 0 0; mso-font-charset:0; mso-generic-font-family:auto; mso-font-pitch:variable; mso-font-signature:3 0 0 0 1 0;} /* Style Definitions */ p.MsoNormal, li.MsoNormal, div.MsoNormal {mso-style-parent:""; margin:0in; margin-bottom:.0001pt; mso-pagination:widow-orphan; font-size:12.0pt; font-family:"Times New Roman"; mso-ascii-font-family:Cambria; mso-ascii-theme-font:minor-latin; mso-fareast-font-family:Cambria; mso-fareast-theme-font:minor-latin; mso-hansi-font-family:Cambria; mso-hansi-theme-font:minor-latin; mso-bidi-font-family:"Times New Roman"; mso-bidi-theme-font:minor-bidi;} @page Section1 {size:8.5in 11.0in; margin:1.0in 1.25in 1.0in 1.25in; mso-header-margin:.5in; mso-footer-margin:.5in; mso-paper-source:0;} div.Section1 {page:Section1;} 


Working at a homebrew store (O’Shea Brewing Company in Laguna Niguel, CA) has allowed me the unique opportunity to interact with homebrewers at every level. From beginners to the most advanced brewers, the thing that has always amazed me the most is the seemingly infinite variety of techniques, methods and subtleties of process that make each individual brewer unique; for every part of the brewing process, there are a dozen brewers with two dozen methods. This is what makes homebrewing fun, and what makes geeking out with other brewers fun too.


While there is an infinite amount of variation in brewing techniques, one big thing working at a homebrew store has taught me is that there are still certain things that every brewer can do to improve their beer. Whether you’re a brand new brewer, or an all-grain brewed with 20 years of experience, this list is one that I think any brewer can look at and get something out of.


1. Learn Your Proper Pitching Rates


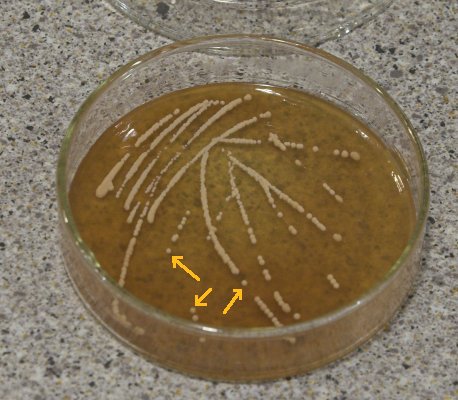
The one thing I try to hammer into the brains of every homebrewer I meet is this simple fact: in brewing, fermentation is EVERYTHING. You can have a coopers hopped kit-in-a-can, or the best, most fine-tuned all-grain recipe, but if you have poor fermentation practices, either can end up tasting like butter, sour apples, or worse. Of all cardinal sins, underpitching is probably the most prominent, and making a yeast starter is probably the easiest way to drastically improve the flavor of tour beer.


Every wort has an optimum number of yeast cells it needs for the healthiest, fastest fermentation. A big, healthy pitch will start faster (often within 4-6 hours, reducing the risk of infection,) ferment stronger and faster, and finish out cleaner. That last part is key to clean tasting homebrew. During the growth phase of fermentation (the first 4-12 hours,) the yeast throw off all kinds of compounds that, if healthy and happy, they reabsorb at the end of fermentation – they essentially scrub the beer clean once they’ve eaten all the sugar they can. Many of the off-flavors associated with a “homebrew-y tasting beer” such as acetaldehyde (a green apple flavor) or the dreaded diacetyl (the butter flavor) remain because the yeast haven’t scrubbed them out due to a lack of health, or vitality. This is why pitching the right amount of yeast is so essential: it produces a far cleaner beer.


According to the late, great George Fix in his book An Analysis of brewing techniques, the optimum pitching rate is .75 million cells per milliliter per degree Plato for ales, 1.5 million cells/ml/*P for lagers. While you could sit down and calculate this by hand, the ubiquitous Jamil Zainasheff has created one of the handiest brewing tools out there, the Mr Malty Pitching Rate Calculator. Just plug in the gravity of your wort, your volume in your fermenter, and the production date of your yeast, and voila – your pitching rate and the proper starter size are right there for you.


While you can pitch multiple vials/smack packs to hit your proper pitch size, a yeast starter is generally a better option, both because it’s cheaper, and because it guarantees you are pitching healthy, active yeast. I’ll do a more detailed post on making starters in the future, but in the mean time, you can find great instructions here, here and here.


I’ll say it again: fermentation is EVERYTHING, and it’s often the most frequently ignored part of the process. And while pitching rates are very, very important, it’s only part of getting the healthiest fermentation you can, which brings me to……


2. Ferment at the Right Temperature


I can’t count the number of times that a homebrewer has brought a beer to the store, wondering why it tastes off. Invariably I’ll ask about their fermentation practices, only to find that first, they just dumped the dry yeast in the kit into their wort without rehydrating (for the love of god, if you’re going to use dry yeast, rehydrate it first.) Second when I ask what temperature they fermented at, I’ll get an answer something along the lines of “uhhh… Room temperature? 80 maybe?”


This is the other main mistake new brewers make, and is the other best way a homebrewer can improve their beer. Every yeast has a temperature they perform the best at; generally speaking for ales it’s between 65-68*F, and 45-50*F for lagers. There are yeasts that bend or break these rules (steam beer yeasts are lager yeasts that ferment in the low 60s, and certain Belgian yeasts can ferment anywhere from the mid 70s to the low 90s), but if you have an ale yeast in your hands, it’s a safe bet that you’ll be fermenting around 68*F. Fermentation temperatures are so important because the flavors the yeast produce can vary wildly depending on the temperature they’re at at any given point in the fermentation process. One big byproduct of fermentation (specifically the growth phase) is esters. Yeast esters are perceived as fruity flavors and aromas that vary from yeast strain to yeast strain (my personal favorite is the White Labs WLP002 English Ale from Fullers, which produces an ester profile often described as orange marmalade). Ester production can be easily controlled by controlling fermentation temperature: ferment cooler and you reduce esters, ferment warmer and you increase them. This is why lagers and lager yeasts are so “clean” (cool fermentation), and why Belgian beers and Belgian yeasts are so distinctively fruity (warm fermentation.)


If you don’t believe me, try this experiment. Make a hefeweizen. Use the exact same recipe, with the exact same yeast and the exact same pitching rate (splitting a 5 gallon batch into two 2.5 gallon Small Batches is a great way to go.) Ferment one hefe at 65*F, and the other at 70*F. What you’ll get is one hefe that is a massive banana/clove bomb (fermented warmer) and another that has some ester, but is more restrained and balanced (fermented cooler.)


This WILL make an enormous difference in your beer.


Say it with me now: fermentation is EVERYTHING!


Now that I have fermentation hammered into your skull, we can move on to my other favorite things that -any- brewer can do to improve their beer.


3. Review your Sanitation Practices


I know what you’re thinking: “pssssh…. I can skip this one. My sanitation is fine! I haven’t had a contaminated beer in years!”


……oh really?


Sanitation is so widely known to be so important, many brewers will get into a sanitation regimen and stick with it. Often, brewers will be so confident in their sanitation, if they get some sort of off flavor, they will pick over their entire process, not realizing that they haven’t disassembled and cleaned their fermenters in two years (I’m looking at you, Mr. Smug I Started Brewing Before Papazian asshole.)


Before your next brew, pick over your sanitation with a fine tooth comb. Think to yourself: is it ok to just spray down this racking cane, or should I be soaking it? Am I good just filling up my bucket with sanitizer, or should I pull the spigot off and sanitize it separately? In fact, how long has this sanitizer been in this spray bottle? Any one of these questions could be the difference between a tasty pint of porter and one that has notes of plastic and band-aid.


4. Calibrate your Equipment


Ever wonder why your beers end up being so sweet/dry? Or over/under your target gravity? The culprit often is equipment that isn’t calibrated properly. Floating thermometers and hydrometers are usually good about not drifting one direction or another very quickly (if at all,) but dial thermometers, and especially digital thermometers, should be calibrated once every few months at the very least. Refractometers are a whole different level – I calibrate mine before every use to maximize accuracy.

Just as important as calibrating your measuring equipment is having an accurate way to measure volume. A sight glass is, of course, the best way to track and measure volume, but a notched spoon or mash paddle can do pretty well.

In general, being as accurate as possible with your measurements will help fine-tune your system and help keep consistency from batch to batch.


Speaking of consistency and accuracy….


5. Take copious notes.


Knowing as much detail about your brewday as possible is the best way to keep repeating any mistakes one might make. And don’t just record your numbers and be done with it! Jot down anything you might think would be useful any time in the future, especially when it comes to anything out of the ordinary during your brewday. Keeping these notes organized and somewhat structured for future reference is also essential; some kind of standardized sheet or brew log is an investment in time and/or money that every brewer should make.


After writing out these five items, I realized that having all 10 items in one post might make for an excessively long read, so check back in a few days for part 2!


Cheers,


Matt

>The Dreaded Trainwreck Brewday (And How Not to Handle It)

>I admit, I get frustrated fairly easily. As a brewer (home or otherwise), this isn’t the best personality trait to have. Many things can go wrong in a brewday, some you can predict and prepare for, others….. not so much. When these things-that-can-go-wrong seem to happen one after another after another, it becomes what I refer to as the Dreaded Trainwreck Brewday (from here on out known as DTBs.) A more level-headed gentleman would shrug off their DTBs and continue on. Me? I prefer obscenity. Lots of obscenity. Generally at high volume.

This is not the proper way to handle a DTB.
Especially one with the conditions I was operating under yesterday. It was my first ever 10 gallon batch (A Small Batch Brewer brewing 10 gallons…… irony?), and I should have known the day would be fraught with unpredictability. Calmness? Nope. Level-headedness? Not really. Cursing? You bet!
After the beers were at last in their fermenters, I thought to myself “There’s NO WAY I’m blogging about today! This was a ^#&$^@$*%^ bunch of &)#^$#%^ with a side of &#*%^!!! *$&^ this!!” However, once the steam cleared from the top of my head, I decided to take the day as a learning experience (aren’t all brewdays, though?) and share what I learned with my readers, as admittedly few as they are (readers… not lessons…)
1. PREPARATION

As with most DTBs, including mine, this is the source of most errors. Brewdays are all about keeping to a schedule (60 minute mash, 90 minute boil, 30 minute cooling, 6 hour lag time, etc), and when the schedule is compromised the beer often is as well. Letting the mash go too long can lead to a thin beer, overboiling can lead to a beer that is too strong or bitter, chilling too far down can lead to stuck fermentations, etc. In my case, my schedule was compromised due to new equipment issues, leading to me mashing for almost 100 minutes instead of the intended 60 (cue cursing). Fortunately, I was high on my mash temp (about 157F), so excessive fermentability I don’t believe will be a problem, but nevertheless I should have prepped my equipment days before, not while I was in the middle of my mash.
Another preparation issue I had was due to my epic chilling apparatus fail. I’ve spoken of my love for the whirlpool chiller and its advantages. Unfortunately my immersion chiller is 25ft of 3/8″ copper tubing – big enough for a maximum of 5 gallons of wort. For this 10 gallon batch I used my tube-in-a-hose counterflow chiller I inherited from my father’s homebrewing system (along with the 15 gallon kettles I was using). It proved to be slow, but effective…. once I got the flow rates dialed in…… halfway through the process. One of my fermenters ended up having to go into my kegerator to be chilled down to proper fermenting temperature (more cursing). Also, I had an idea for how I was going to monitor the temp of the wort coming out of the chiller, but it proved to be rather ineffective, leaving just the thermometer strips on my buckets to let me know what temperature I was fermenting at (you guessed it. more cursing.) Again I was fortunate, overshooting my fermenting temp by only about 5 degrees. I brewed up a Flanders Red, a style requiring extensive aging, so I believe any off-flavors created by a warmish fermentation will fall away or be consumed by the plethora of wild yeast and bacteria in good time.
2. Good Personal Condition

The combination a high stress day, lots of caffeine, and very little food is the perfect way to have a DTB. Not only does it lead to scatter-brain, but small issues seem much worse than they actually are (anybody who had overconsumed caffeine on too little food knows exactly what I mean. Lots of cursing.) This really leads directly back to #1, as my lack of preparedness screwed my brewday schedule, and the time I was supposed to be eating was consumed (pun intended) by equipment problems (and cursing.) Especially when a brewday is going to be unpredictable, a good personal condition is essential to keeping one’s head on straight.
3. Weather

Obviously, this is the element one cannot control, but somehow all of my DTBs have some kind of weather issue. Being in a valley in inland Southern California, my issue is usually wind. Rain I can handle. Cold? No problem. Heat? No sweat (ha!) Wind…. is the great brewday destroyer. If you aren’t working with a completely closed system, the amount of crap it can force into your unfermented wort is astounding, as is its ability to permeate wherever you go. For my Small Batches, I can just close the windows, but for 5 gallon batches or larger, when one must be outdoors or in a very well-ventilated area due to your propane burner(s), there is no escape. The secret here is to take it in stride. One can’t control the weather, and most can barely predict it, so should weather issues arise, have a beer and hope things turn out for the best.
Have you had a DTB recently? Are there common elements to your DTBs? Is it just me, or does DTB sound like an STD? I’d love to hear what your experiences are, so let me know in the comments!
Cheers
Matt
Categories: advice, musings

>Yeast Propagation Equipment for the Small Batch Brewer

>

I’ll admit it. This is an area that I don’t have a lot of knowledge in yet. I’m just super stoked that my order from Cynmar arrived! Soon I’ll be plating, slanting, and culturing myself a sweet yeast library. As I don’t yet have any practical experience, I can only point you to the two main sources of my research:

1. Eric Lowe’s awesome yeast slanting write-up on HomeBrewTalk.com: A great practical step-by-step tutorial on slanting yeast for long-term storage, with lots of references.
2. Yeast – The Practical Guide to Beer Fermentation by Jamil Zainasheff and Chris White: More in-depth and advanced than Eric’s write-up, with extra info on other ways you can use lab analysis to improve your beer.
Cheers,
Matt
Categories: advice, equipment, yeast

>Equipment for the Small Batch Brewer

>

The Small Batch Brewer’s equipment setup can vary just as much as any brewing setup, but the Small Batch Brewer has a few particular requirements due to the small batch size, and there are a few things that become especially handy. After about six months of trial and error, this is the setup I’ve come up with, and I think it works pretty well.
The Crush:
Much of my homebrew gear was inherited from my father when he stopped brewing. Fortunately, like me, he was a bit of a gear head, so I got a few very nice pieces of equipment I wouldn’t otherwise be able to afford. The first is my Valley Mill.
Some old-school brewers will recognize the brand; this was a pretty popular option before the company unfortunately went out of business. Owning my own mill provides two main advantages:
1. Bulk grain lasts much longer if stored whole. Crushed grains lose their freshness fairly quickly, and having many grains whole and on-hand allows me a lot of flexibility when it comes to quick recipe formulation.
2. Your crush is one of the biggest factors in extraction efficiency, and owning my own mill allows me to dial in my crush to my own system, instead of dialing in my system to my LHBS’s crush. After dialing in my crush, I regularly achieve 80% extraction efficiency with no lautering issues.
The Mash:

I mainly use a good ol’ fashioned 5 gallon Igloo cooler with a Phil’s false bottom.


For sparging, I’ve found that batch sparging is the most efficient and least time-consuming method. I’ve tried fly sparging a small batch, but I found no particular advantage, and it was more equipment-intensive and time consuming.

The Boil:

My main kettle is a 30 quart Polarware economy stainless steel kettle.

The 30 quart size is great because I can do 90 minute boils (with my boiloff rate, I start at about 4 gallons pre-boil) without worrying about boilovers, and I can also use it for the occasional 5 gallon batch.

I added the weldless spigot for the convenience of taking samples, draining from the bottom, and to use my pump for a whirlpool. I think any brewer worth their salt knows how handy a spigot on their kettle is.

Chilling the Wort:

For small batches, a standard 25′ 3/8″OD copper immersion wort chiller is more than sufficient for my needs. Mine is a suitably ugly homemade job.


I mentioned I use a pump in conjunction with the immersion chiller; This dramatically increases the efficiency of the immersion chiller by continuously circulating the wort (my setup is inspired by Jamil Zainasheff’s Whirlpool Chiller. Googling it will bring up a ton of great info.) Without this, most brewers experience stratification, where the wort immediately around the chiller is much cooler than throughout the rest of the kettle. To create the inlet for the whirlpool, I simply bent a piece of 3/8″ copper so I could attach a hose coming from the outlet of my pump.


Here’s the whole apparatus in action:

Fermentation:

For me, the six gallon bucket is the best and most convenient primary fermentation vessel. They’re cheap, easy to clean, easy to heat (for diacetyl rests), and easy to move. Also, having a spigot drilled makes transfer a snap. Yes, they are quite oxygen permeable, so I wouldn’t leave a batch in one for more than a few weeks, but for 1-2 week primaries the advantages far outweigh the disadvantages for me.

Instead of using a sealed lid and airlock, I have a loose fitting lid that sits on top of the bucket, effectively creating open fermentation. Honestly, this is more for convenience than anything. With the loose lid it becomes easier to quickly pull a sample, and the fact that it’s clear lets me see whats going on inside.

I rarely do secondaries, but when I do (dry hopping, fruiting, long-term aging) I’ve found nothing better than 3 gallon Better Bottles.

They’re light, easy to clean, unbreakable if dropped, punted for easy racking off the sediment, and their square shape makes multiples fit better into closets and the like. Here’s a couple in action holding some sour beers I’m aging, along with some 5 gallon sour batches, also in Better Bottles:
A quick word on Better Bottles: There are some in the homebrewing world who argue that glass carboys are superior. I personally have not heard a convincing argument that Better Bottles are flawed in any way. There is the oxygen issue (some argue that Better Bottles are oxygen permeable, which would oxidize the beer during long-term aging), but according to the Better Bottle website, the permeability is negligible unless you’re planning to age something for several years. I still have yet to hear an effective refutation of this, and I have had no oxidation issues at all (for the sour brewers out there, the pellicles on my sours are from burping the airlocks, not from any supposed wall permeability.) If anybody has proof otherwise, please let me know! The goal in the end is simply to make better beer, and I’m open to any method.
Serving:

Like many experienced brewers, I grew tired of bottling days quickly. Kegging was the obvious choice, and as a Small Batch Brewer, the 3 gallon Corny Keg is both a blessing and a curse:


A blessing because of the perfect size for small batches, and the space savings in my keezer (a kegerator made from a chest freezer, for the uninitiated). A curse due to both the rarity (small kegs are becoming increasingly more difficult to find used), and the extraordinary cost of new ones (easily $120 new). Suffice to say, whenever I come across one, I try my damndest to get my grubby little hands on it.

I do bottle condition on occasion, mostly if I’m planning on aging a beer in the bottle (very big beers, sours, anything brett-spiked). The nice thing about bottling a Small Batch is that it usually makes a tidy single case of 12oz or 22oz bottles.

Measuring:

One last thing that is incredibly handy for a small batch brewer is the refractometer:


I check my gravities as frequently as I can (especially during fermentation), and if you use a standard hydrometer, the repeated pulling of large samples can take a significant toll on your final yield. With the refractometer, all that’s required is a few drops to get an accurate sample. Also, most refractometers have ATC (Automatic Temperature Correction), so the number you get doesn’t have to be adjusted for temperature like a hydrometer.

Unfortunately there are some disadvantages. First, most hydrometers can’t read over a gravity of 1.120, or 30 Brix. This isn’t a problem 95% of the time for me, but when it comes time to do a really big beer, it’ll be annoying to have to break out the hydrometer every time I need to take a reading, especially because fermentation schedules are so critical with high gravity beers and need to be closely monitored. Secondly, refractometers are built to take readings on pure sucrose solutions. Wort is mostly maltose, so there is a correction factor that has to be applied to get an accurate OG reading. Also, after fermentation begins, another correction has to be made for the presence of alcohol. Fortunately both of these issues can be sidestepped with almost any brewing software.

Conclusion:

Many brewers can adapt their current setups for Small Batch Brewing, and I hope my methods can inspire other brewers to do the same. Do you ever do Small Batches? If so, let me know your methods in the comments!


Cheers,
Matt
Categories: advice, equipment